
SCIEX OS software can support external devices that are not under direct control by using contact closure. Contact closure enables synchronization of the SCIEX OS software controlled device (the MS) and the external device (the LC in this case), ensuring that experimental batches can be generated and run on the two devices with appropriate timing. For example, a sample batch can be developed in SCIEX OS software for MS acquisition, and then the same sample batch can be replicated on an external LC device with the desired methods and autosampler settings. With contact closure in place, acquisition of mass spectra will be triggered upon the start of the LC gradient method on the external device. This post will explain how to use contact closure to synchronize a NanoLC 425 system for nanoflow and microflow chromatography with a mass spectrometer controlled by SCIEX OS software.
Setting up the contact closure:
- Connect the contact closure cable from the LC system to the AUX port of the mass spectrometer. Make sure you have plugged the cable into the gradient channel on the back of the LC that you are planning to use for the gradient runs.
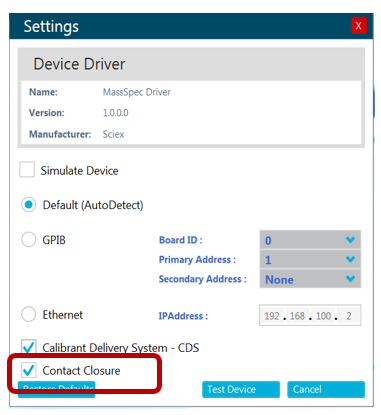
- On the SCIEX OS software home screen, click the Configuration tile. Select mass spectrometer, and then click the Edit button at the top right of the screen (the mass spectrometer will need to be deactivated in order to edit the configuration). After clicking Edit, a device dialog will open. Click the Settings button. The dialog, shown below, will open. Select Contact Closure at the bottom of the dialog.
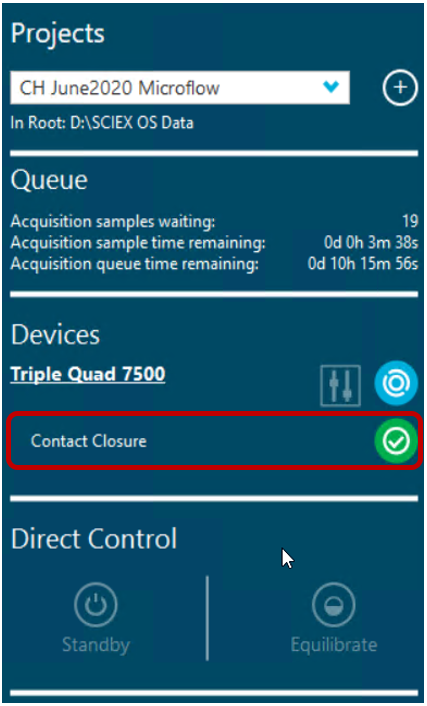
- After selecting Contact Closure, click Test Device. If the device test is successful, a message in green text will appear. Then, click Save in the Device Window and click Activate Devices at the top of the screen. Under Devices in the status bar on the right side of the screen, Contact Closure should now be present with a green check mark (see screenshot).
- Remember to turn off contact closure when you are switching over to a different LC system that is controlled by SCIEX OS software.
Setting up the MS system batch:
- Set up your batch in SCIEX OS software. You do not need to select a method in the LC Method column. The plate and vial location information is not used.
- When running your samples, you will see that contact closure is enabled in the right-hand status bar.
- Make sure that the MS method duration is less than or equal to the LC gradient method runtime, as defined on the NanoLC 425 system. This ensures the MS is always waiting for a signal from the LC before advancing in the batch.
- Note that the LC information will not be automatically stored in the MS data file. It is recommended that custom columns are added to the SCIEX OS software batch so that the autosampler or LC methods used, or any other key information, are recorded in the data file.
Setting up the LC system batch:
- Using the standalone Eksigent Control software, build your desired autosampler method and your LC method.
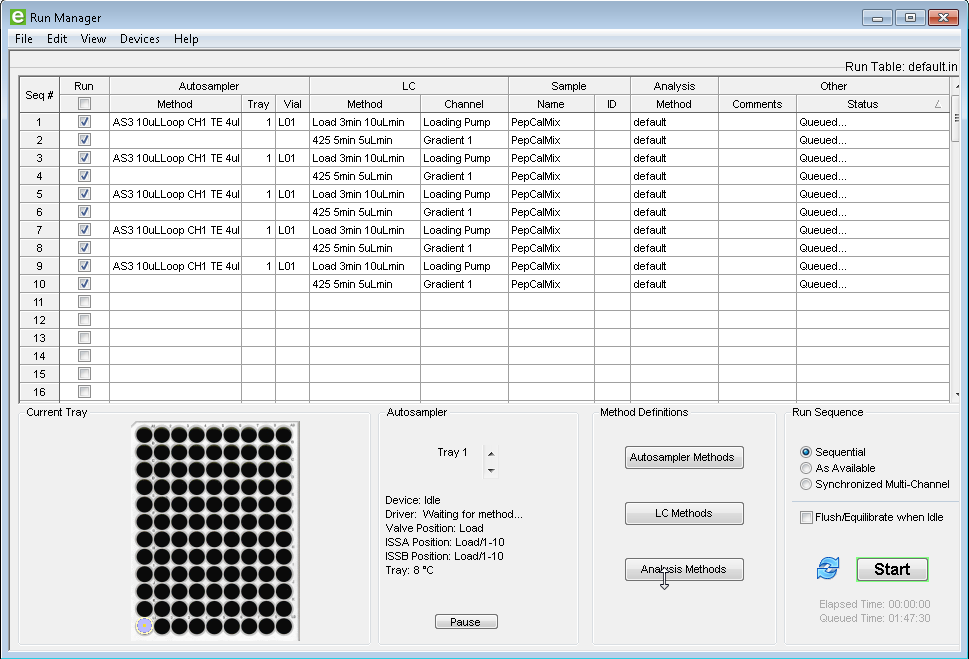
- Next, set up your batch within the LC software using Run Manager.
- Include autosampler method information in the Autosampler Method column, along with the position of the sample tray and vial number.
- In the LC column, include the LC pump method along with the channel used. Note that for Trap Elute experiments, two methods need to be specified: one for the loading pump (first row) and one for the gradient pump (second row).
- In the Run column, select all the desired samples to be run. Make sure that the number of samples checked matches the number of samples in the SCIEX OS software batch for MS acquisition.
- Best practice is to copy the sample name information from the SCIEX OS software batch to the Run Manager table, to ensure you are keeping your two separate batches in sync.
Viewing the pressure traces after acquisition is complete:
- To store the pressure traces for your files, you can give them the same names as your data files in SCIEX OS software.
- First, copy the name of your data file from SCIEX OS software into the Sample column in Run Manager. Note that if performing the Trap Elute workflow, there will be two rows for each data file so the filename should be replicated for both rows.
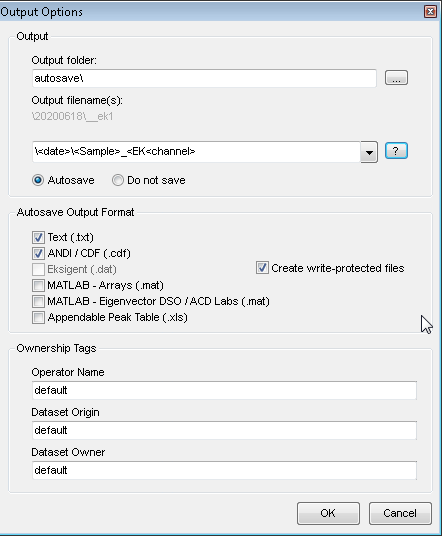
- Next, open the Output Options from the File menu.
- You can change the folder in which the pressure traces are stored, by changing the Output Folder.
- You can control how your pressure trace text files are named in the Output filename field. Recommended settings are shown below. Use \<date>\ to create a new subfolder in the Output Folder for the date of acquisition. Then use <Sample>_<EK<channel> to give the file the name of your data file appended with the pump number.
- The pressure traces can be viewed later by selecting File > Open and browsing for your date folder and your specific data file name and pump.
Starting acquisition:
- Click Start in the Run Manager. Make sure you start the batch at the same sample line as the first sample to be run in the SCIEX OS software batch.
- Submit the MS batch to the queue in SCIEX OS software, then start the queue. The MS system will display “Loading” status while waiting for the LC injection.
RUO-MKT-18-11908-A

 Contact Support
0 Comments