There are two options for data storage when working with the OneOmics suite. You can store your data either within the SCIEX Cloud platform in the Data Store, or you can store data in BaseSpace (Illumina) and link your BaseSpace account with the SCIEX Cloud platform.
CloudConnect for PeakView software 2.2 is used to upload all files (data files, FASTA files, ion library text files) to either platform. Software and installation instructions can be downloaded from the SCIEX website. Note that some general use files and demo data have already been uploaded to the SCIEX Data Store and are widely available for use (ion libraries, FASTA files and demo data, for example).
Watch the CloudTalks or read below!
How to upload files to SCIEX Cloud Data Store
Files are uploaded to SCIEX Data Store using CloudConnect. After they are uploaded, files will be seen under the Data Store in the Experiment Manager tile of SCIEX Cloud. Data Store can also be used as the results destination for your processed data.
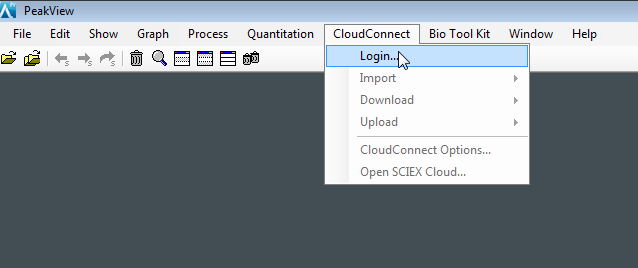
- Launch PeakView software, and then go to the CloudConnect menu. Select Login.
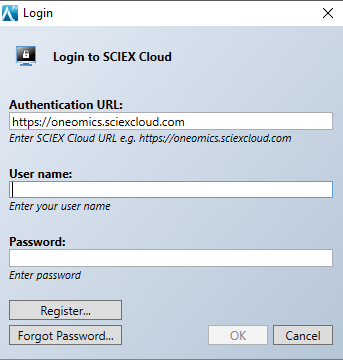
- A dialog to enter your credentials appears. To access your account in the SCIEX Cloud Platform, enter the Authentication URL, and then enter your username and password. Click OK.
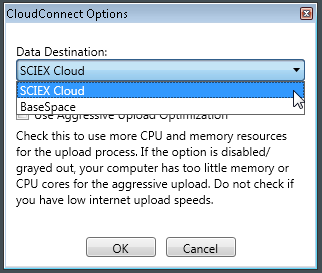
- Now that you are logged in, you can select the cloud data storage option you wish to use. Select CloudConnect > CloudConnect Options. Change the Data Destination to the desired data provider. In this example, we will select SCIEX Cloud Data Store.
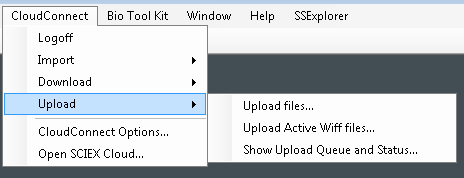
- To upload data, select CloudConnect > Upload > Upload files.
- Choose the files to be uploaded and then click Open. In the next dialog, choose the directory to which you would like to upload your data.
- You can upload files directly from your hard drive by selecting Upload files.
- You can upload files that you have previously opened in PeakView Software by selection Upload Active wiff files.
- To upload FASTA files or ion libraries for proteomics (*.txt files or *.group files) use the Upload files option.
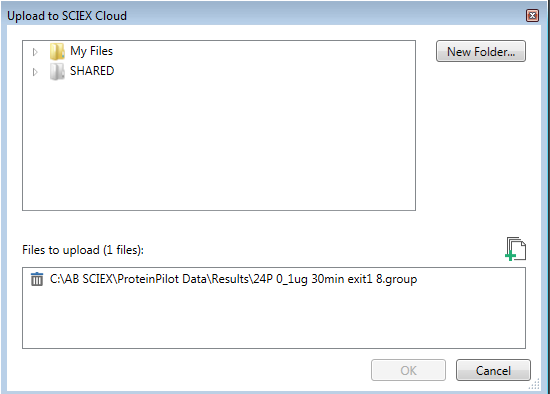
- If this is the first time using SCIEX Cloud Data Store, click New Folder to create a new directory for your data. Note that files can be uploaded to folders that have been shared with you and to which you were granted write-access (indicated by their orange color).
Uploading files to BaseSpace
To upload a file, first login to your BaseSpace account and create the project where you want to store your files.
- Follow the steps outlined above until you get to selecting the Data Destination (Step 3). In this step, select BaseSpace.
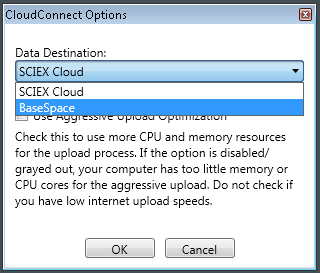
- Now you will be able to select Upload and choose from the upload options explained above. The files will be uploaded to the BaseSpace project.
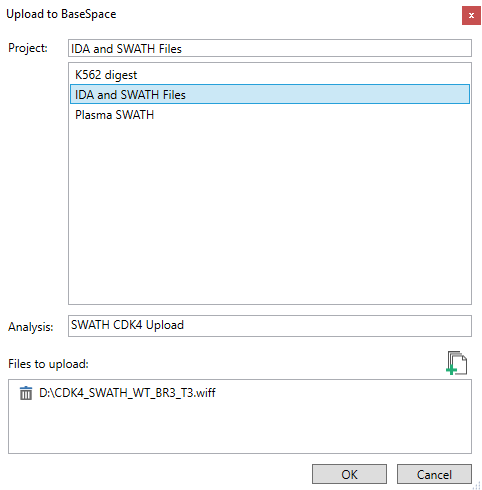
- Select your destination project and then select the file. Click OK to begin uploading.
Data upload queue
Once the upload has started, you can monitor the progress by opening the Upload Queue And Status window from the Upload menu. The status of each file is shown. A rotating circle shows that a file is currently uploading. A green check mark shows which files have completed. The percent completed is also shown in a column for each file. A batch of files selected for upload can also be removed by clicking the trash can. The uploaded files will now be available in either Data Store or BaseSpace (whichever was specified for upload) in the destination project. You will now be able to process your uploaded data in the OneOmics suite!

RUO-MKT-18-12200-B


 Contact Support
0 Comments